1920 Straight-Line Dress Description
If, before deciding on a dress, large women would always try to visualize themselves sitting down in the dress, rather than standing just as erect as they know how, they would obtain a more satisfactory result. Oftentimes dresses are too small through the hips or too tight around the waist or too stiff around the neck, and consequently they slip up on the figure. When they do this, they not only appear uncomfortable but actually are.
Dress Style
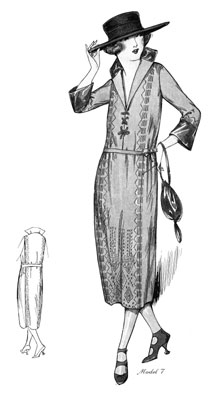
Frequently, women rounded out in body complain that the fashion magazines overlook them, giving few designs entirely suitable for their needs; hence, the straight-line dress in this Fashion Service. It is one that can be developed becomingly for a "partridge plump" or a slightly plump woman, and the reasons for this are to be found in the long vest line, the long embroidered side lines, the front skirt panel, the full-length panel in the back, as well as the diagonal line over the hips. A side plait is used at each panel edge in front and back to give, unnoticeably, fulness for the large figure. Dresses for plump and large women should have the position of every line care- fully planned out by means of a muslin model; then the dress itself should always be well made, with smart simplicity or dignified decoration a definite style feature.

Smooth-surface materials are almost invariably in better taste than rough weaves for the large figure, and these materials make possible plaits so carefully placed and pressed as to be almost unnoticeable. Plaits of this kind should be preferred by those who choose to look more slender than they really are.
Ribbonzine embroidery thread, which is very soft and re- sembles narrow, flat braid, is used for decoration in this straight-line dress. Ribbonzine works up so quickly and so satisfactorily in the heavy materials that it is much appreciated by dress artists. For instance, the darning-stitches in the front, which add much to the attractiveness and value of the dress, can be made in a short time with ribbonzine.
In executing long embroidery lines like this, lay the material out very flat and carefully secure it in place on the table so that the stitches cannot draw in any place as they are being made. One of the chief beauties of good embroidery work is the easy placing of the thread. Not one stitch should be drawn the least bit, for tight stitches never make successful embroidery.
Dress Material and Pattern.
Firm, soft cloth of attractive twill, such as serge, and heavy satins, silk faille, or poplin, and Canton crepe, all lend themselves admirably to this type of dress. The poplins and crepes are especially appropriate when made up crosswise of the material so that the heavy thread runs down rather than across or around.McCall pattern No. 9704 gives to a nicety the pattern lines of this straight-line dress, which is developed in nut-brown duvetyn with copper-colored satin collar and cuffs and embroidery in self-colored ribbonzine with a few silver threads to give it character. For the average figure, 3 yards of 54-inch material and 1/4 yard of satin will be sufficient for making this dress.
Panel Cutting.
Place the center-front and center-back edges of the panels on a lengthwise fold of the material, and arrange the other pattern sections so that a lengthwise thread extends through the center of each. An exception to this rule may be made, as already suggested, if you are using corded material, in which case a piecing will be necessary at the back waist line.
If you wish the neck-line finish illustrated here rather than the one provided in the pattern, use a plain front-closing pattern as a guide in cutting the center front and the neck line, and make allowance beyond the center front for a facing about 4 inches wide at the neck edge and 2 inches wide at the waist line.
If you do not desire plaits under the panels, slash the side sections of the skirt pattern and separate them "from 2 to 4 inches, thus giving fulness that may be gathered in at the diagonal joining of the side skirt gores to the waist.
Cut the sleeves of this model three-quarter length or long and close-fitting, according to personal preference. For a three-quarter length sleeve, cut a cuff facing of satin that will be, when finished, about 4 inches wide. This may be shaped with the lower portion of the sleeve pattern.
Cut the collar out of a straight piece of satin that, when finished, will be about 4 inches wide and correspond in length with the neck measurement. Also, cut a facing of the dress material this same size and shape.
Dress Construction.
Baste the under-arm seams of the waist; then turn under the lower edge of the side waist portions on the seam line and baste these to the side skirt sections. Next, turn the edges of the front skirt panel and the back full-length panel on the lines marked from the pattern, and baste these flat to the waist and side skirt sections. Leave the left skirt seam open at the top for a placket. Also, leave the left front waist line of the waist and the skirt panel free to provide an opening.
Fitting the Dress.
Observe, in addition to general fitting details, the width of the panels, and narrow the front panel toward the waist line and the back panel across the shoulders if to do so will make the figure appear to better advantage. If the dress shows any tendency to fall toward the front, try lifting it just a trifle at the back armhole, thus drawing it up at the sides and overcoming this difficulty.
As the collar of this dress does not roll over to cover the joining line in the back, the fitting of the dress at this point should be done with special care. If the panel does not fit up well around the neck, it will prove worth your while to remove the bastings that secure it to the remainder of the dress and lift the whole panel from 1/4 to 3/4 inch, depending on the alteration that is needed. Then mark the new neck line and pin the new shoulder line. See that the shoulder line does not drop at all beyond the shoulder point. The length of the shoulder regulates the height of the armhole curve, and unless this is brought well up on the shoulder much of the smartness and becomingness of the dress will be lost.
Finishing the Dress
First mark the shoulder line very accurately and remove the bastings. Then stitch the under arms in a plain pressed-open seam and the waist and side-skirt portions in a narrow tucked seam. Next, stitch the panels on the wrong side, a seam's width from the raw edges, and finish the placket.
Apply the embroidery before proceeding any further. Be sure not to catch the stitches through the plaits and thus prevent their opening. Arrange the stitches so that they will appear in continuous rows when the plaits are laid flat. The illustration shows five long stitches on the upper portion of the plait and two stitches at the side, although there is a third stitch under the plait that is evident when the plait is open. If the sleeves are short, embroider them above the satin facing; if they are long, embroider the wrist edge.
Join the shoulder edges with a plain pressed-open seam. Then make the collar, turn back the portions allowed for front facings on the waist, and apply the collar as you would in attaching a similar collar to a plain blouse; that is, with all the seam edges to the inside of the collar.
At the center-front waist closing, work with buttonhole-stitches over small eyelet rings, so that a silk lacer may be run through, and finish the waist line of the left front to make a neat closing. Then make a tailored bow in the narrow girdle, tack this in position, and, in addition to securing snap fasteners along the dress closing, sew one under the bow in the girdle, so that this may be neatly fastened.
Related Articles: 1920 Fall-Winter Ladies Fashions | Waist-Line Dress | One-Piece Coat Dress | Tuxedo-Scarf Dress | Long-Waisted Dress | Kimono Waist-Line Dress | Long-Tunic Dress | Straight-Line Dress | Over-blouse Dress

